Pages

Friday, October 26, 2012

Baked Cheese Sandwiches


Kate here today from KatrinaPalmer.com. I'll be posting once month here. These are an upscale version of grilled cheese sandwiches. They pair perfectly with an herbed tomato soup. Delicious comfort food. They are simple to make so let’s get started. Here’s what you’ll need:
12 slices bread
grated cheese (cheddar, monterey jack, a mix, your choice!)
parmesan cheese
3 eggs
1 3/4 cup milk
3 T. minced onion
1 1/2 tsp. prepared mustard
3/4 tsp. salt
pepper (optional, I use 1/4 tsp.)
2 tsp. minced parsley
Arrange six slices of bread in a 9 x 13 glass baking dish. Here I've used my homemade whole wheat bread.
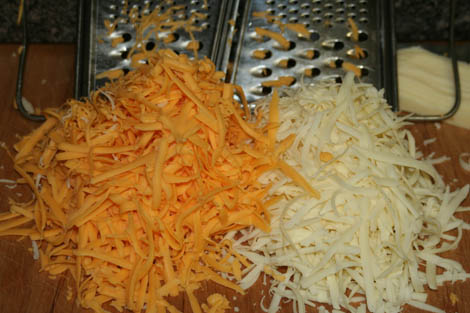
Grate enough cheese to cover the bread. I used cheddar and monterey jack. I want to try pepper jack sometime.
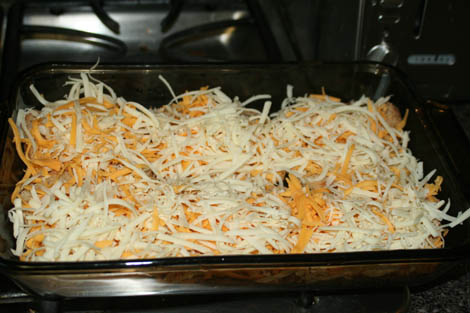
Sprinkle the grated cheese over the six slices of bread. This is also the place to sprinkle on some parmesan. I skipped it because I was out of parmesan cheese.
Top with six more slices of bread.
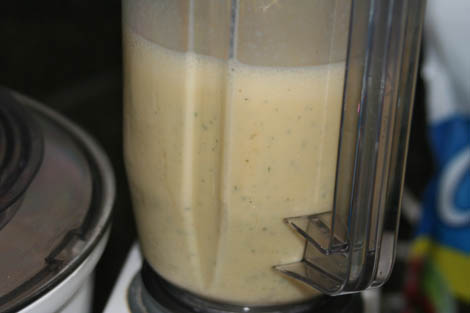
Put the remaining ingredients in the blender.
3 eggs
1 3/4 cup milk
3 T. minced onion
(Lots of times I don't mince the onion first. Okay, I never mince the onion first. I cut off a small chunk of onion and throw it in the blender.)
1 1/2 tsp. prepared mustard
3/4 tsp. salt
pepper (optional, I use 1/4 tsp.)
2 tsp. minced parsley
Blend it all together and
carefully pour the mixture over the sandwiches in the glass dish. Go slowly and make sure every part of the top layer of bread is moistened or it will cook up hard and dry. Bake uncovered in a 350° oven for 45 minutes or until golden and puffy. (While it bakes, make your herbed tomato soup!)
Yum! Serve and enjoy!
Baked Cheese Sandwiches
12 slices bread
grated cheese (cheddar, monterey jack, a mix, your choice!)
parmesan cheese
3 eggs
1 3/4 cup milk
3 T. minced onion
1 1/2 tsp. prepared mustard
3/4 tsp. salt
pepper (optional, I use 1/4 tsp.)
2 tsp. minced parsley
Arrange six slices of bread in a 9 x 13 glass baking dish. Here I've used my homemade whole wheat bread. Grate enough cheese to cover the bread. Sprinkle the grated cheese over the six slices of bread. Sprinkle with parmesan cheese. Top with six more slices of bread. Put the remaining ingredients in the blender. Blend all together, and carefully pour the mixture over the sandwiches in the glass dish. Go slowly and make sure every part of the top layer of bread is moistened or it will cook up hard and dry. Bake uncovered in a 350° oven for 45 minutes or until golden and puffy.

Kate is the author of The Guy Next Door and can be found at KatrinaPalmer.com or on FB at KatePalmerAuthor.

Wednesday, October 24, 2012

Upcycling Mom's Shirts to Dresses for Girls

This post is a blast from the past from my Rachelle's Writing Spot. The great thing is that the maroon dress is still in action--passed down from older sister to younger. So this went from Mom's shirt to girl's dress Xs two!

One afternoon I decided I'd better patch some more of my daughter's pants before school resumed. I will post a tutorial about how I do that next.

When I pulled out my fabric scraps to let the girls choose what I should use for the patch, they got really excited about the possibilities. They wanted me to make them new pants from the scraps. I tried to explain that you had to have more fabric to make a whole pair of pants.
Then I remembered all the cute makeover projects I'd seen on Make It And Love It

I ran up to my closet, pulled out two shirts that I hadn't worn in over a year and went to work making two darling dresses for my girls.

This is one of those skin-tight shirts and so it took less than twenty minutes to pull together for my four-year-old.
I tried it on her, pinned it up, sewed, and cut off the excess. I pulled up the tops of the shoulders to decrease the neckline to the right size.
I love these cute stripes on my brown-eyed girl!

Miss G's dress took a few more steps because the shirt was kind of odd to begin with. I purchased it for $1 on clearance at Wal-Mart, yes that's one dollar, people!
I tried it on her several times and she was very worried about getting stuck with pins. I sewed up the sleeves to fit her arms and then I had to work with the neckline which was designed kind of like a cowl-neck top.

I had some beautiful lace in a box of sewing scraps that I used to get this dress to the right length--just at her knee.

La Piece De Resistance was the brooch that came with the shirt. Miss G thought that was fabulous. She said that she looked like a princess!

My girls were all decked out for our holiday party and love their new dresses. So do I, because you can't beat FREE!
I'm excited to try this again. I need to clean out my closet and see what else I can find.
Do you have some sewing projects on your to do list this year? What gets your creative bug going?

Friday, October 19, 2012

Famous Idaho Mashed Potatoes Recipe

Potato harvest is drawing to a close, so we thought it was high time to post our Mashed Potatoes and Crafts Secret Recipe for Smashing Spuds!

Mashed Potatoes are so easy, but you can jazz them up a little.

Here's how to make Smashing Spuds

To make 6-8 servings, take 5 good sized Idaho potatoes and start scrubbing.


Don’t peel the potatoes!
When making Idaho Mashed Potatoes, scrub spuds thoroughly then use a paring knife or peeler to remove three strips of skin, one on each end, and one in the middle. Cut and boil the potatoes until fork tender.

 Drain off the water and if you'd like, save the potato water to put in your next batch of homemade bread or dinner rolls. It makes them extra soft.
Ready to mash?
Use a potato masher or electric beaters, depending on the consistency you like--extra smooth or a bit chunky.
Next add 1/2 cube butter, 1/4 cup heavy whipping cream, 1/2 teaspoon salt, and a tablespoon of seasoning. We like the Red Robin Seasoning (the same stuff they use on their fries) or you can use Season All or another favorite blend.
Mix together and give it a taste.
 Delicious!
 You can vary the recipe to your preferred taste, but the seasoning really gives it that extra special flair--not overpowering, just enough to make you go Mmmmmm.
Rachelle loves those Idaho potatoes! Hope you enjoy Smashing Spuds from MashedPotatoesandCrafts.com


Wednesday, October 17, 2012

A Stitch From My Memory

The other night after I tucked my girls into bed and sang to them, I walked down the hall and sat at my sewing machine to finish up a fun project (which I'll be posting shortly). In between the whirs of the sewing machine, I could hear my girls whispering. One of them said, "I hear Mom sewing."
It brought back a flood of memories and warm feelings.

I remembered sleeping in our basement with my door cracked open just a bit and my mom working late into the night sewing on her trusty Bernina. My mom is an excellent seamstress and she taught me how to sew pretty well, but sometimes those clothing patterns still make me go cross-eyed! Not Mom, she can whip up a pair of shorts, patch a pair of pants, sew a prom dress, or make a Halloween costume with seemingly little effort.
The sound of her sewing machine was comforting to me--the needle clicking up and down past my bedtime and into my dreams meant my mother loved me. Falling asleep to the sound of her working on another project when she was most certainly bone tired from a full day's work and then another day's work when she arrived home--farming with my dad and raising kids--was evidence of how important we were to Mom. The sewing machine making tiny, even stitches across baby blankets and knit dresses was like a lullaby in itself that sent me to sleep with a reassurance that mom was there.

I finished up my project and my sweet girls were sound asleep. As I clicked off the light on my sewing machine I thought about how lucky I am. My mother took the time to teach me how to sew and I enjoy it, but the most important thing she taught me with every spool of thread spinning into the night was the depth of her love for her family.
I love you Mom. Thank you!

Does crafting bring great memories to your mind? We'd love to hear about them.

Wednesday, October 10, 2012

Sweet Meat Squash

This is a Sweet Meat Squash that I grew in my garden this summer. It's about the same diameter of a basketball--quite a bit of squash in there! There's about 4 more that size still in my garden.
I tasted a delicious squash soup last year made with butternut and so I googled it and found a few recipes to play with. Since sweet meat can be substituted, (a lot of fleshy orange squashes can be interchanged in recipes) I adapted the recipe below to my variety of squash and my family's tastes. Click here to visit the web page where I found the recipe for the main inspiration of this soup.


The flavors of this soup were divine! I love the extra creamy texture that you get by blending the ingredients. I think it might've tasted better the second day--or else I was really hungry! My one year old baby gobbled up his first bowl and wanted more.


Don't get frightened off by the length of the recipe, this soup is really easy to make! I froze my leftover roasted squash and I used it to make Squash Stuffed Ravioli--delish!

Roasted Sweet Meat Squash Soup

Ingredients

  • 2 tablespoons extra-virgin olive oil
  • 1/2 cup (1/4-inch) diced onion
  • 1/4 cup (1/4-inch) diced celery
  • 1/4 cup (1/4-inch) diced carrot
  • 1 1/2 tsp. cinnamon
  • Sea salt
  • Freshly ground black pepper
  • About 4 cups chicken stock or broth
  • 1 1/2 cups Roasted Winter Squash recipe
  • 1/2 cup half-and-half, optional

Directions

Heat the olive oil in a large saucepan over medium heat until hot. Add the onion, celery, carrot, and cinnamon and saute until soft but not brown, about 10 minutes. Season with salt and pepper.
Add the chicken stock and bring to a boil. Simmer for several minutes. Stir in the squash until smooth, then simmer gently to let the flavors meld, about 10 minutes.
Puree the soup in a blender until smooth. (The soup can be made ahead to this point, cooled, covered, and refrigerated for several days or frozen for about 1 month. It will thicken as it cools and may need thinning with stock or water when reheating.)
Return the soup to the pan and reheat gently. Add the half-and-half, if using. Adjust the seasoning with salt and pepper. Keep warm until service.
*Once you add the half-and-half, don't boil as it breaks down the consistency.

Roasted Winter Squash:

  • About 3 pounds squash (preferably 1 large squash), can use Sweet Meat, Butternut, Banana
  • Sea salt
  • Freshly ground black pepper
  • 1/2 cup (1 stick) unsalted butter
  • 2 tablespoons finely chopped fresh sage leaves
  • 2 tablespoons granulated sugar
  • 1/4 cup balsamic vinegar
  • 1/4 cup dark unsulfured molasses
  • 2 teaspoons Toasted Spice Rub, recipe follows
Preheat the oven to 400 degrees F. Peel the squash with a vegetable peeler. Halve lengthwise, discard the seeds, then cut into 1-inch dice. Place in a large bowl and season with salt and pepper.
Heat the butter in a medium skillet over medium-high heat. When the butter ceases to foam and has turned a light brown, pull the pan off the heat and immediately add the sage, sugar, vinegar (stand back so as not to get splattered), molasses and toasted spice rub. Mix well and let simmer over medium-low heat for 1 to 2 minutes to meld the flavors.
Pour the vinegar mixture over the squash and toss well, then transfer to a heavy rimmed baking sheet or baking dish large enough to hold the squash in a single layer. Place in the oven and roast, tossing at least once, until very tender and caramelized, about 45 minutes to 1 hour. Set aside until cool enough to handle but still warm, so the liquids are runny.
Working in batches, if necessary, transfer the warm squash and all the cooking liquids to a food processor and process until smooth. Use immediately, refrigerate for up to 5 days, or freeze for up to 2 months.

Serving suggestions: Serve the puree on its own as a side dish for roast chicken, turkey, or pork; stir into polenta just before the end of cooking; use as a stuffing for ravioli; make into a soup; or use to flavor pastina. Or omit the sage, season with ground cinnamon and freshly grated nutmeg to taste, and use as a substitute for canned pumpkin in your favorite pumpkin pie recipe.
Place on a baking sheet, cut sides up, and roast at 400 degrees F until tender. Scoop out and puree.
Yield: about 2 cups puree


Try it out--I dare you! Let me know if you like it. Remember, you can substitute most orange, fleshy squash for this recipe. Just use whatever you have on hand.
Enjoy!

Wednesday, October 3, 2012

Making clouds

Hello fans! 
Kristie here today from Kristie Kreates
Rachelle invited me to be a guest poster on her blog and
I was totally honored and thrilled to do it. 
I will be posting on the first Wednesday of each month and this is my first post here on Mashed Potatoes and Crafts.
Today I'm going to show you how to put some clouds in the sky on a card.
It's an easy technique and doesn't take a lot of special tools or supplies.
There are a couple ways that you can create your cloud masks.
Above I have used a piece of scrap card stock and drawn some clouds.
They are pretty simple to draw, as you can see, I didn't draw anything very complicated.

Next you will need to cut the clouds out.
The 2nd way you can create cloud masks is to use a punch.
The 3 clouds at the top were punched from a cupcake punch.
They are the frosting part of the cupcake. 
I used a Stampin' Up punch for these.

Now that they are punched out,
adhere them to the piece you want to create the sky on. 
Be sure to use removable adhesive.  
I have also masked an area at the bottom that
I want to have remain white.

Using blue ink and a blending tool apply the ink over the surface of the card.  I used Distress Ink and a foam pad on a blending tool, but you don't have to have these supplies.  You can use any kind of ink and if you don't have a blending tool, try a make up wedge.
 
Once you have the sky looking the way you want it, you are set to remove the masks. By the way, if you want to use a couple colors of blue or even some pinks or purples, that is fine too.  It's your sky, so make it whatever color you want.

After the masks have been removed you have a pretty sky with clouds.
Depending on your card, you may want to stop here, but I'm going on to show you how I did the rest of my card.

I spread white glue over the 'hill' area on my card,
being sure to cover all of the white area.

Then I sprinkled glitter over the glue.
I do this right over the container I keep the glitter in,
but just in case, I have a scrap paper under it to
catch any glitter that doesn't stick.
The glitter can easily be poured back into the container this way.

I stamped the image, colored it and fussy cut it.
I put some Glossy Accents on the sled blades to give them shine.
I adhered the image to the card with foam tape to give a little dimension.
I looked at the card and decided that it looked a little empty on the right side, so I made another hill in the background, stamped, colored and cut a little house and trees and added that to the card.
 
Because the 2nd hill is over the blue background, it has a blue cast to it.
I like the differentiation that this gives. 
To prevent the color showing through, I could have cut a piece of white card stock to glue down to the card then covered that with glitter.
All in all, I'm happy with the way my card turned out.
 
Thanks for stopping by today.
  I hope you have learned something and been inspired to have some crafty fun.
Leave a comment if you will and if you have any questions, feel free to ask.
If you've been inspired, we'd love to hear about it, if you have a link to a picture of your project, leave it in the comments, so we can check it out.
 
The stamps I used are:
"Snowy Cabin" (#13807)
"Sledding"(#8707)
Both these are available from QKR Stampede