Here's a trick question for you? Do you think this treat is something you should feed your kids today for a snack before lunch?
Guess what? I do!
It looks like a donut, but look closer . . . it's an apple slice!
My kids were so excited about making this and we found the recipe from our new cookbook, Young Chefs by Christina Dymock. She did a great guest post last week, see it here http://www.mashedpotatoesandcrafts.com/2013/06/guest-post-on-teaching-young-chefs-by.html
How do you make them?
Core your apple, slice it in about 1/4 inch rings. Next spread with Hazelnut chocolate spread (Nuttella) and add a few sprinkles. My kids loved their donuts and I let them each have two! I figured even with two they didn't get a full serving of Nuttella (which still has plenty of sugar, so go easy!)
What other ideas do you have that substitute treats loaded with refined sugars and carbs? I'd love to hear them!
Pages
▼
Friday, June 28, 2013
Thursday, June 27, 2013
Best Ever Homemade Powdered Laundry Detergent Recipe

Today the Mashed Potatoes and Crafts site is featured over at Sugar Bee Crafts as part of the rockin' Red, White, and Blue series! Be sure to visit Mandy's amazing site and check out the roundup of fabulous posts on everything your heart desires.
So how does laundry detergent tie into the Red, White, and Blue theme? It's summertime--the season of BBQ stains in the form of red ketchup and blue popsicles and I want to show you how to keep your summer whites looking great!
For over a year now, I've been using my own homemade powdered laundry detergent. I began studying the best recipes/methods so that I could save money and what I found in the process is that I could cut down on a lot of the added chemicals in store-bought laundry detergent. I'm working on improving that further but I'm pleased with my recipe.
I created a video tutorial that is just over five minutes long that you can watch for step by step instructions.
I'm also including the recipe and instructions here.
MashedPotatoes and Crafts Homemade Powdered Laundry Soap Recipe
Makes 300-500 Loads
1 (4lb 12 oz) Box Borax
1 (3lb 7 0z) Box Super Washing Soda
1 ( 3lb) Container OXY clean (you
can adjust this amount to your preference. I use a little less.)
2 bars soap grated—one Fels Naptha, one
hotel soap (free!) or other favorite soap
1 (2lb) Boxes Baking Soda
1 Bottle Downy Unstopable Scent
Booster
Use a large bucket to mix all ingredients together. Just dump the boxes into the bucket. I recommend doing the mixing outside to avoid inhaling soap powder.
Use a fine cheese grater to grate your soap. *Great tip for easy grating. Put your bar of soap in the microwave for 6-7 seconds. This will soften it just enough to make it much easier to grate the soap.
Use a large wooden spoon to stir all of the ingredients together, making sure that your soap flakes are blended well.
That's it! You're ready to wash. Test out a few batches to gauge whether you'd like to use 1, 1 1/2, or 2 Tablespoons of laundry detergent. Don't be concerned if the water doesn't sud up like store-bought detergent. Your clothes are still getting clean!
Recommended use:
2 Tbsp each load for Super Capacity
top-load washer
1 Tbsp each load for Super Capacity
front-load high efficiency washer
1 Tbsp each load for Regular load size top-load washer
2 Teaspoons each load for Regular load size in front-load washer
I also created a short reminder video, just two minutes long when you're ready to mix up your first batch!
If you'd like some great tips on cleaning your washer to increase its cleaning capacity, check out my series on
What do you think? Are you ready to make your own homemade laundry detergent? Let me know in the comments what works for you or if you have any other great tips you'd like to add, please share!1 Tbsp each load for Regular load size top-load washer
2 Teaspoons each load for Regular load size in front-load washer
I also created a short reminder video, just two minutes long when you're ready to mix up your first batch!
If you'd like some great tips on cleaning your washer to increase its cleaning capacity, check out my series on
25 Places You Didn't Know Were Dirty and How to Clean Them
Visit this link http://www.mashedpotatoesandcrafts.com/2012/11/25-places-you-didnt-know-were-dirty-and.html
Thanks for visiting Mashed Potatoes and Crafts. If you'd like to get to know me and the contributors a little better, visit our ABOUT page here http://www.mashedpotatoesandcrafts.com/p/about.html

Wednesday, June 19, 2013
Guest Post on Teaching Young Chefs by Christina Dymock
Teaching Young Chefs by Christina Dymock
Here’s the thing, you can relieve your work load and have fun with your kids in the kitchen. “How?” you ask with a bemused look.
Take a little time to teach them simple skills.
Think of it this way: Give a kid a meal and you feed him for a day. Teach the kid to cook and you never have to feed them again.
(Okay, that might be a slight exaggeration.)
But think of it, if you taught him/her how to make one dinner you could have one night off a week. Teach each kid in your house how to make one meal and you could have several nights off a week. Hmmm, I hear the wheels turnin’.
It doesn’t have to be a 5-star meal. Simple chicken dishes can be a lifesaver and with all the easy-to-sprinkle flavor packets it’s easy-peasy to throw something together.
If your kids are too young to handle raw meat on their own or use the stove, have them make side dishes. They can stir things together, rip lettuce for a salad, and even mash potatoes. Just be sure to get them on the right level. Having to reach up and over the counter will make things too difficult for young ones and invite spills.
One thing I love about cooking with my kids is that they tend to open up while their hands are busy. Because I’m not staring into their beautiful eyes and wishing I had eyelashes as thick as theirs, they relax and share things about their day. (It’s when I learn their secrets.) It’s also when I give them little pointers about holding a cutting knife or the speed of the hand mixer. It’s laid back because they are actually helping. It’s a great time to be together.
*If you'd like more info about Christina and her new cookbook, read on!
http://teachingyoungchefs.blogspot.com/
Here's a little info about Christina's new cookbook Young Chefs: Cooking Skills and Recipes for Kids Young Chefs by Christina Dymock- Hey kids! It’s time to take
charge in the kitchen. Become a young chef as you make your favorite
foods and explore new recipes with everything from Game Day Hot Dogs to
Lemon Shark Bars. Each recipe tells your parents when help is needed and
also includes stories, jokes, and history about the recipes. You’ll be
whipping up masterpieces in no time. Let’s get cookin’!
Fourth of July printable word art
Jordan from Wayward Girls' Crafts here! Since the Wayward Girls' Founding Father (aka DAD) shares a name with one of our country's Founding Fathers, the Wayward Girls have been brought up with a love of our homeland.
To celebrate the Fourth of July, I decided to try my hand at word art:
To print this free printable, click on the picture above. (You might want to open the image in a new tab or window.) Make sure that the image is full-size: it should be bigger than your screen. If it isn't full size, click on it to blow it up. Then, from the menu of your browser, select print preview. The image is designed to print at 7"x9.1" (I had it at 8x10 but it was giving my printing program troubles still. Plus you can use a mat this way.) Make sure your page orientation is set to landscape and scale the picture to fit the page.
(Or you can fiddle with the settings to get it to print however you like.)
I think the "of the" might be my favorite part. The font looks like it's from a dollar bill!
How are you planning to celebrate (or decorate for) the Fourth of July? Or what's your favorite patriotic holiday?
Wednesday, June 12, 2013
Family Style Chicken Fajitas
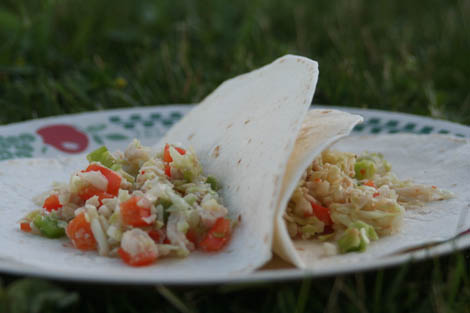
Kate here again with another recipe. This morning we filmed another Kate's Kitchen episode featuring these yummy fajitas. I call it family style because I prefer chopped ingredients over the typical julienned ingredients. It leads to fewer meltdowns at the table when my little cowboys and cowgirls bite into the tortilla. Chopped ingredients are much easier for little mouths to manage.
Here are the ingredients. This photo was taken on a night I didn't have any fresh chicken in the house but needed dinner NOW. So I used a can of chicken. On the show today I used 3 chicken breasts. These fajitas go together so quickly and are great for using your summer garden vegetables. So start chopping your ingredients.
1 red bell pepper
1 green bell pepper
1 onion (not pictured)
3 chicken breasts (about 2 cups of meat)
1/2 head of cabbage (I used the coarse grater on my food processor--perfect!)
1 green bell pepper
1 onion (not pictured)
3 chicken breasts (about 2 cups of meat)
1/2 head of cabbage (I used the coarse grater on my food processor--perfect!)
First, chop your chicken and pour 1/2-2/3 cup of Zesty (make sure it's Zesty, not regular) Italian dressing over it and let it marinate while you prepare the other ingredients.
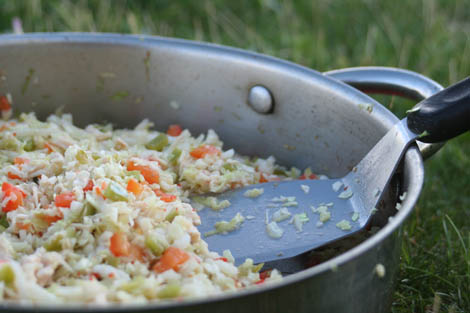
Once all the veges are chopped, heat your wok or a large fying pan. Pour meat and dressing into the hot pan and cook until no pink remains. About 7 minutes. Remove the meat from the pan (not the juices). Stir in the vegetables and stir fry until tender crisp, about 5 minutes. I usually add another couple tablespoons of Zesty Italian dressing at this point, too. When the vegetables are tender crisp, add the meat back to the pan and heat through.
Serve on warm tortillas with Salsa Verde, not red salsa. The cabbage and salsa verde complement each other very well. Red salsa, not so much.
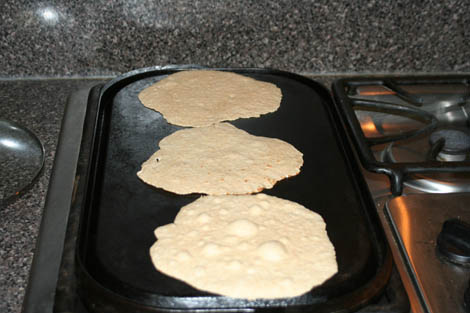
On the show I also show you how to make these super easy whole wheat tortillas, but I'll have to save that for another post. Hope you enjoy these super simple fajitas.
Chicken Fajitas
2/3 - 1 cup Zesty Italian dressing
1 red bell pepper
1 green bell pepper
1 onion (not pictured)
3 chicken breasts (about 2 cups of meat)
1/2 head of cabbage (I use the coarse grater on my food processor--perfect!)
1 red bell pepper
1 green bell pepper
1 onion (not pictured)
3 chicken breasts (about 2 cups of meat)
1/2 head of cabbage (I use the coarse grater on my food processor--perfect!)
First, chop your chicken and pour 1/2 cup of Zesty (make sure it's Zesty, not regular) Italian dressing over it and let it marinate while you prepare the other ingredients.
Once all the veges are chopped, heat your wok or a large fying pan. Pour meat and dressing into the hot pan and cook until no pink remains. About 7 minutes. Remove the meat from the pan (not the juices). Stir in the vegetables and stir fry until tender crisp, about 5 minutes. I usually add another couple tablespoons of Zesty Italian dressing at this point too. When the vegetables are tender crisp, add the meat back to the pan and heat through.
Serve on warm tortillas with Salsa Verde. Enjoy!
Wednesday, June 5, 2013
Gift Box
Hello! Kristie here from Kristie Kreates
I'm going to show you just how easy it is
to make a cute little gift box.
My husband wanted something to put some
mixed nuts into to give to his sister,
so I made one like this.
Then I thought,
heck this would be a great project for a tutorial,
so here it is!
For the box I made here I used
a piece of card stock that measures 8" x 12"
Along the 12" side, score at 2 1/2", 5", 7 1/2" and 10"
Turn the card stock and along the 8" side score at 2"
Then fold on all score lines.
Cut out a small V shape at each fold
up to the 2" score line, so it looks like in this picture.
There is a 2" flap at the end, cut that right off.
You can see how it should look in the picture below.
up to the 2" score line, so it looks like in this picture.
There is a 2" flap at the end, cut that right off.
You can see how it should look in the picture below.
If you want to decorate your box, this is when you want to do it.
It's much easier to decorate it before it is put together.
It's much easier to decorate it before it is put together.
Cut 4 pieces of decorative paper measuring 2 1/4" x 5 3/4"
Adhere the decorative paper to the sides of the box
and apply adhesive to the smaller flap at the end.
This flap will be adhered inside the opposite end to form the box.
and apply adhesive to the smaller flap at the end.
This flap will be adhered inside the opposite end to form the box.
Your box should now look like this.
Put adhesive on the flaps and fold them in to form the bottom of the box.
Now for the top. Cut a piece of card stock measuring 3 5/8" x 3 5/8"
Score each side at 1/2"
Fold all sides.
On two opposite sides cut in along the score line to the 1/2" score line.
Then cut a small diagonal cut to make a V.
Add adhesive to the small flaps. I used score tape.
Cut a piece patterned paper 2 3/8" x 2 3/8"
Adhere patterned paper to the box top.
Adhere small flaps inside to form top.
Your box is done.
Here are a couple pictures of my box.
If you have any questions, feel free to leave them in the comment and I'll answer them as soon as possible.
Thanks for stopping by today.
I'd love it if you would stop by my blog
and see what else I've been creating!
Until next month, have fun creating!


